Sunday, March 28, 2010

A New Craft for the Family?


So, this weekend Laura decided she wanted to learn to crochet. She was all excited and couldn't wait to get to the store to purchase the supplies. I agreed to buy yarn and a hook (needle, stick--honestly, I don't even know what you call the "tools"). I had told her I didn't know how to crochet nor did I want to learn a new craft. She promised that she knew everything there was to know...she had "googled" it. Well, it turns out crocheting was a little harder than it looked on the web. After a huge fit from Laura, Chris agreed to try...he's much better at looking at a diagram and following it than I am. Well, it turns out Chris is a mighty fine crochet-er. Yep, he's surrendered his man card and has crocheted until his hand hurts. Laura's still learning, and I'm still sticking only to stamping and paper crafts! You all know I have a REALLY awesome husband! :)

Friday, March 26, 2010

More Samples of Holiday Blitz


Holiday Blitz is this coming Monday, March 29. Here are two more samples of the cards you will make at the class. There's lots of holidays represented, so this is a great opportunity to stock up on some cards. The cost is $20. Please RSVP as soon as possible. I'll be cutting card stock and getting ready on Sunday afternoon! Hope to see you here!

Thursday, March 11, 2010

More Spring Classes--Office Accessories


This is a really fun class of office accessories. You'll modify a file folder into this handy notebook/pen holder plus making matching binder clips and a variety of other office accessories. This makes a great coordinating gift or would look perfect on your own desk! Cost of the class is $30. The date for the class is May 3, but the RSVP date is April 19 because I will need to pre-order the supplies. Let me know soon if you'd like to attend!

Spring Classes


The first photo is the Sweet Pea stitched felt class. It is on April 21, although the RSVP date is April 1. The second photo is the Spring Fun card class. The reason the cards look unfinished is because I intentionally left off any sentiments. You can make these cards be whatever you need! They are actually made with the Eggscellent Eggs Easter egg decorating kit, but instead of using it for eggs, I decided to make them all into Spring cards. The RSVP date for this class is March 24. The final photo is the Holiday Blitz card class. Holiday Blitz paired with Teeny Tiny Wishes makes a large variety of cards--you'll be well stocked for lots of occasions! The date for Holiday Blitz is March 29; the RSVP is March 26. The cost for Holiday Blitz and Spring Fun are $20 each. The Sweet Pea class is $25. All classes are offered during the morning (10 a.m) and during the evening (anytime after 5:00 p.m.). I hope you are able to attend an upcoming class very soon!

Tuesday, March 9, 2010

Bulletin Board!

Tonight was Open House at the girls' school. What fun! Last week Laura's teacher emailed me to ask if I could come help her put up a bulletin board. Well, this probably won't surprise you, but that used to be one of my VERY FAVORITE parts of teaching!! (I think that's why I like to scrapbook...it's just a smaller bulletin board!) Mrs. Rosales did all the layout and the hard work. I just put up the letters, leaves, vine, and borders. Most of this bulletin board isn't stamped, but of course, I had to work a few stamping elements into it. Check out that vine--it's Stampin' Up! packing material! I also stamped the stationery the kids wrote their summaries on. Laura was so proud that her summary made it on the Standards Based Board. Naturally, Chris and I were very proud of that too!

Bailey's Birthday!

My sweet neighbor is turning 7 soon! Her mom always makes my girls' birthday cakes--delicious and beautiful--so I had to do a good job on her invitations! I used the Simple Birthday Thanks stamp. I "modified" mine...I cut out the center part of the cupcake that has the thank you note form when I mounted it. This allowed me to simply stamp the outline of the cupcake. I did the party info on the computer and printed it on Pretty in Pink card stock, then used the Stamp-a-Ma-Jig to get the cupcake base stamped such that all the party info was perfectly centered. (The SAMJ is a "must have" tool. Let me know if you need to learn how to use it...I'll give you a private lesson and you'll be sold!) I stamped the top of the cupcake on Close to Cocoa card stock and cut them out. The cherry on top is the best part--I stamped them in black, colored them in with Real Red and then added Crystal Effects over the top. This photo doesn't do it justice--they are shiny and sparkly in real life!

New Member Dinner at St. Paul

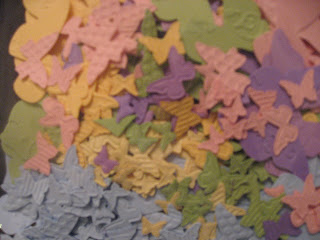
We had the New Member dinner at church last Sunday. I made the place cards for the tables. They match the invitations I made several weeks ago. I also made butterflies to use like confetti around the center pieces on the tables. I die cut hundreds (yes, literally hundreds!) of butterflies with the Beautiful Wings embosslit. The Family Life Center looked so spring-y and festive. It was a great day to celebrate new members of our church family! Laura was excited that her job at the end of the dinner was to pick up all the butterfly confetti pieces...she did a great job...I think she got every last one of them!


Wedding Shower Favors

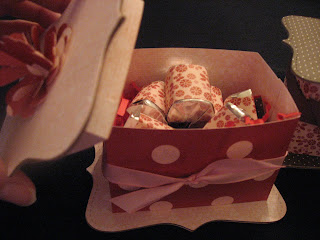
Here are some samples of some wedding shower favors I made. It is so hard to make samples for someone else to look at and decide...there are so many permutations. The colors my friend told me were "pink and brown"...well, is that Regal Rose, Pretty in Pink, Pixie Pink, Pink Passion...you get the idea! Then, I could easily do 25 different designs on the front...it would easily get overwhelming for all of us! I'm hoping she likes one or the other of these...or if these aren't her favorites, I'll try again!
For the favor, I used the Fancy Favor Box die cut. This die cut cuts out the pattern complete with the decorative top and the score marks. It takes no time at all to glue them together! I made one open (filled with a cello bag with candy) and the other one is closed. It is amazing how much will fit in one of these boxes...closing it with the stewardess bow helps control the amount of stuff you have to put in it.

Thank You Notes


I made these "thank you" notes for a friend of mine who is starting up her Just Jewelry business. She wanted to have some notes to send hostesses or customers after purchases. I made a variety for her so she could choose which ones she liked the best. These are only two of the designs...I made 6. The neat thing about these notes are that they are really only a note card...she'll write her note on the white area you see there. Under the "thanks" flap is her name and contact info for her business. I love the way these turned out...and so did she! I need to get working on the 20 more she ordered from me. :)

Top Note Treat Boxes


Is there anything that the Top Note die cut can't do? Check out these super cute boxes! The top note forms the top and the base of the box and then I folded designer paper and used the Tombow Multi-Purpose glue to adhere them together. The "bow" on top is the scallop circle cut in half and snipped to the center. I wrapped Hershey Nuggets in the same designer papers and tucked in a Sonic gift card. It made a very cute and easy gift! I made these for Valentine's Day, but they are appropriate for any gift giving occasion--just change the papers!


Thursday, March 4, 2010

Clear Mounts!

Stampin' Up! has just recently started offering Clear Mount stamps in addition to our regular wood mount stamps. Clear Mounts aren't new to the stamping/crafting world...in fact, many have wondered why Stampin' Up! has not offered these years ago? Well, SU always felt the stamped images from the clear stamps weren't up to the quality standards that they wanted, so they held off offering them. Well, now they've come up with a solution that everyone is happy about...SU is still using the traditional foam and rubber that you are accustomed to, but they are offering it with a vinyl cling backing (or sticker) so that it works with clear mounts.

Clear Mount sets come in a DVD sized storage case with all the images of the stamps on the front and sides of the insert. This makes it very easy to find what you are looking for and conserve space at the same time. The Clear Mount blocks come in nine different sizes and are 3/4" thick and have grooved sides. I am personally very new to the clear stamps, but I think I'm going to love them. At Sandie's workshop everyone raved about the Clear Mounts, and those ladies who had experience with other brands said Stampin' Up! definitely had higher quality blocks. Stampin' Up! always sells quality products so while I wasn't surprised to hear that, I was grateful to get the opinion of others who had used products from other companies. Most all the stamps in the Occasions Mini are offered in either clear or wood mount...oh, and did I mention, clear mount stamps are cheaper!! Yea...more stamps for the dollar...and they save space...more space for more stamps...what could be better?!?!

Birthday Pages


These are the two pages that I made to coordinate with the 6" by 6" page that we made at Sandie's workshop. I struggle with pages that I know are going to people with boys...you know me...GIRL MOM all the way! Sandie thought these pages were great and that was awesome because I made them for her as a "thank you" for hosting the workshop. My hostess gifts are always different and just whatever I feel like making at the time, so it was a perfect way to give these to Sandie while at the same time showcasing what you can really do with a 6" by 6" size page.
By the way, I LOVE my Simple Letters Alphabet die cut set. They are still a good size, yet they are skinny enough to fit a lot of letters across a page. The other decorative elements on this page are the use of the scallops. I added a little bit of Real Red card stock that was punched with the scallop edge behind the 6" by 6 pages so that the blue border didn't blend into the background. I also added a half circle mounted on the scallop circle that said "Happy Birthday to you" above the small page on the right. It is so easy to make scrapbook layouts when you start with 6" by 6" pages as the focal point. While I did make these to give to Sandie, I also made a set to keep for myself. Now, if only I had time to put photos on all the page layouts I have I might be closer to being caught up on my scrapbooking!